สร้างระบบ ThinClient ใช้ในองค์กร 6/8
อัปเดท : 5 กุมภาพันธ์ พ.ศ.2552 , แสดง : 18,378 , ความคิดเห็น : 2
หลังจากติดตั้ง Terminal Service ของ Windows 2003 และการเปิดใช้งาน Remote Desktop ของ Windows XP เรียบร้อยแล้ว ตอนนี้สภาพแวดล้อมต่างๆก็จะเหมือนระบบทั่วไปที่ เครื่องลูกข่ายสามารถ รีโมทเข้าไปใช้งานโปรแกรมต่างๆบนเครื่องแม่ข่ายได้ตามสิทธิ์ที่กำหนดโดย ชื่อผู้ใช้และรหัสผ่าน
ต่อไปเราจะมาดูขั้นตอนสำคัญที่จะ ติดตั้งให้เครื่องลูกข่าย บูทและเข้ารีโมทเครื่องแม่ข่าย มีขั้นตอนคร่าวๆ ดัีงนี้ (พยายามจะเขียนเป็นขั้นตอน)
1. ก่อนอื่นต้องโหลดโปรแกรมและ Image file ทั้งหมดก่อนซึ่งดาวน์โหลดได้ที่ http://thinstation.sourceforge.net เข้าในส่วนของดาวน์โหลด (Download) ซึ่งในหน้านั้น มี Image file หลายรูปแบบให้เลืือก ดาวน์โหลด ตามเหมาะสมว่าจะให้ ระบบบูทกับอะไร ซึ่งในที่นี้จะเป็น PXE บูทซึ่งเป็นการบูทผ่าน Lancard แนะนำให้เลือก Prebuilt images
| การบูทของระบบ thinstation นี้สามารถเลือกบูทได้หลายแบบ เลือกตามสภาพแวดล้อมของระบบ เช่นบุทผ่านฮาร์ดดิสก์ ,บูทผ่าน CD ,บูทผ่าน LAN CARD (PXE) ซึ่งในที่นี้จะแสดงถึงการ บูทผ่าน LAN CARD (PXE) เพียงอย่างเดียวส่วนการบูทแบบอื่นๆ ท่านสามารถศึกษาได้จาก http://thinstation.sourceforge.net |
2. เมื่อได้ไฟล์แล้วก็ให้ เขียนไฟล์ลง CD โดยใช้โปรแกรมเขียนแผ่นทั่วไป หรืออาจสร้าง Image Drive เพื่อเปิดไฟล์
3. ผมเองไม่ขออธิบายในรายละเอียดเนื่องจากศึกษาได้จาก ไฟล์ต่าง ๆใน CD แต่ขอสรุปว่าหลักๆมีไฟล์ที่ต้องใช้ 2 ไฟล์ ซึ่งเป็น Image ไฟล์ คือไฟล์ thinstation.nbi และ ไฟล์ thinstation.nbi.zpxe และต้องใช้ไฟล์ config อื่นๆ ดังรายละเอียดด้านล่าง ส่วนโครงสร้างการวางไฟล์ ผมขอไม่อธิบายเป็นข้อความแต่จะให้ดูเป็นรูปถ้าถึงขั้นนี้ น่าจะพอเข้าใจได้ไม่ยาก

โฟลเดอร์ D:\boot ซึ่งเป็นโฟลเดอร์ที่สร้างขึ้น เพื่อจัดการเก็บไฟล์ที่ช่วย boot ระบบเทอมินอลทั้งหมด โดยระบบ windows ต้องกำหนด permission ให้ user,everyone สามารถ อ่านโฟลเดอร์นี้ได้ด้วย
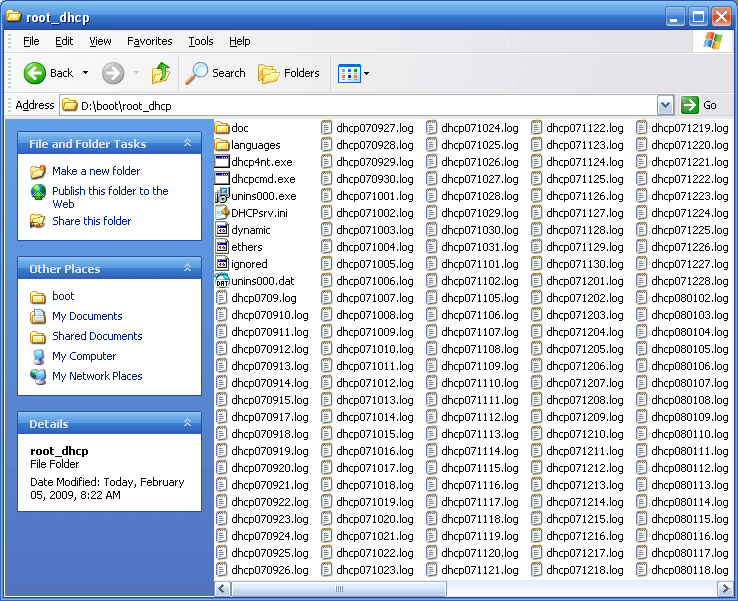
โฟลเดอร์ D:\boot\root_dhcp เป็นโฟลเดอร์ที่เก็บไฟล์ เกี่ยวกับ DHCP Server ซึ่งการตั้งค่าต่างๆของโฟลเดอร์นี้ ดูได้จากบทความก่อนหน้านี้ http://www.nextproject.net/contents/default.aspx?00073

โฟลเดอร์ D:\boot\root_tftp เป็นโฟลเดอร์ที่เก็บไฟล์ เกี่ยวกับ TFTP Server ซึ่งการตั้งค่าต่างๆของโฟลเดอร์นี้ ดูได้จากบทความก่อนหน้านี้ http://www.nextproject.net/contents/default.aspx?00073 จากรูปมีไฟล์ที่ต้องใช้ 2 ไฟล์ ซึ่งเป็น Image ไฟล์ คือไฟล์ thinstation.nbi และ ไฟล์ thinstation.nbi.zpxe และต้องใช้ไฟล์ config อื่นๆ เช่น thinstation.conf-192.168.1.22,thinstation.conf.network (ตัวอย่างด้านล่างสามารถประยุกต์ใช้ตามนี้ได้เลย)
ไฟล์ config อื่นๆ
thinstation.conf.example
This file must be named "thinstation.conf<xxx>" where <xxx> can be:
|
.buildtime |
Defines the defaults build into the image (note the leading .) |
|
|
|
.network |
Default config file loaded from the TFTP server. |
thinstation.conf.network |
netboots |
|
.user |
Config file on local storage. |
thinstation.conf.user |
CDboots |
|
-<name> |
Specific config file on the TFTP server for the terminal"name" (e.g. thinstation.conf- jakkrite). Requires thinstation.hosts. |
thinstation.conf- jakkrite |
netboots |
|
.group-<id> |
Config file for a group of terminals (e.g. with printer setup for those terminal with local printers. Requires thinstation.hosts. |
thinstation.conf.group-800x600 |
netboots |
|
-<IP> |
Specific config file on the TFTP server for the terminal withthe IP number <IP> specified |
thinstation.conf-192.168.1.20 |
netboots |
|
-<MAC> |
Specific config file on the TFTP server for the terminal with the MAC address specified. |
thinstation.conf-00aa556677 |
netboots |
thinstation.hosts (MAP Client, Group and name)
#=========================================================# # HOST MAC GROUPS COMMENTS # #=========================================================# TS203 00d0b7491b21 800x600 usb_print # TS Computer (Multi Group) TS203 00d0b7491b21 800x600 # TS Computer jakkrite 005001231234 # jakkrite (Computer Name ) |
thinstation.conf.network (ตัวอย่าง กำหนด config กลางไม่ระบุเครื่องลูก)
| AUTOSTART=On SESSION_0_TITLE="Windows Terminal server" SESSION_0_TYPE=rdesktop SESSION_0_RDESKTOP_SERVER=192.168.1.251 #select one option. #SESSION_0_RDESKTOP_OPTIONS="-u '' -p - -a 16 -r 'disk:floppy=/mnt/floppy,CD=/mnt/cdrom,USB=/mnt/usbdevice/0.bus0.target0.lun0/part1" # with Mapping Floppy /CD-ROM/USB # --- General Options SCREEN_RESOLUTION="1024x768" # --- Printing Options #PRINTER_0_NAME=parallel #PRINTER_1_NAME=serial #PRINTER_2_NAME=usb |
thinstation.conf-192.168.1.22 , thinstation.conf-00AA112233 (ตัวอย่าง กำหนด config ตาม IP , MAC)
AUTOSTART=On SESSION_0_TITLE="Windows Terminal server" SESSION_0_TYPE=rdesktop SESSION_0_RDESKTOP_SERVER=192.168.1.251 #select one option. #SESSION_0_RDESKTOP_OPTIONS="-u '' -p - -a 16 -r 'disk:floppy=/mnt/floppy,CD=/mnt/cdrom,USB=/mnt/usbdevice/0.bus0.target0.lun0/part1" # with Mapping Floppy /CD-ROM/USB # --- General Options KEYBOARD_MAP=en_us #SCREEN_RESOLUTION="1024x768" MOUSE_RESOLUTION=100 # --- Printing Options PRINTER_0_NAME=parallel |
thinstation.conf.group-usb_print (ตัวอย่าง กำหนด config เพิ่มเติมจัดกลุ่มตาม printer)
PRINTER_2_NAME="usb" PRINTER_2_DEVICE=/dev/usb/lp0 PRINTER_2_TYPE=U |
thinstation.conf.group-800x600 (ตัวอย่าง กำหนด config เพิ่มเติมจัดกลุ่มตาม ความละเอียดหน้าจอ)
| SCREEN_RESOLUTION="800x600" |
เมื่อ set ไฟล์และระบบเรียบร้อยแล้ว ก็ลองทดสอบดูเลยครับ โดยขอเล่ากระบวนการอีกครั้ง
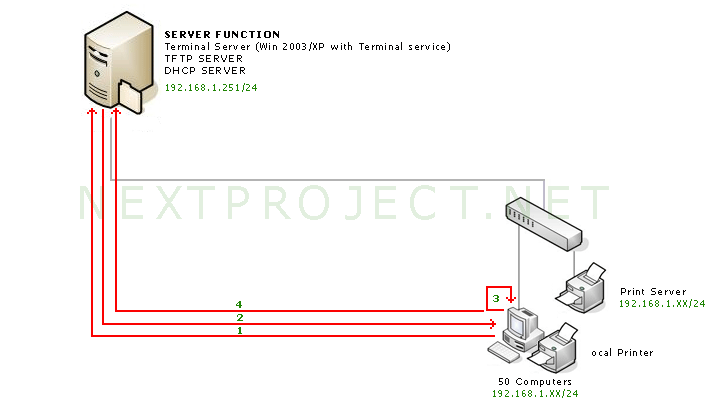
1. เมื่อเครื่องลูกข่ายบูต เข้าเครือข่าย และเครื่องลูกไม่ได้ Fix IP ไว้ มันก็จะ ฺboardcast ทั้งเครือข่าย คล้ายๆ Who am I ถามว่ารู้มัยว่าหนูเป็นใคร ซึ่งโดยปรกติจะเป็นหน้าที่ของ DHCP (192.168.1.251 - dhcp server) ที่บอกว่าคุณคือ 192.168.1.21 นะ NetMask คุณคือ 255.255.255.0 ,GATEWAY,DNS และอื่นๆที่จำเป็น เครื่องลูกข่ายก็นำค่าต่างๆนั้นมาใช้ ต่อไป แต่ใน ระบบ Terminal ที่ผมจะนำเสนอนี้ ตัว DHCP SERVER ที่ใช้ต้องมี Option เพิ่มเติมซึ่ง DHCP SERVER ทั่วไปไม่มี (หรือมีแต่ผมไม่รู้) ก็คือ ฟังก์ชั่น ในการส่งค่า Next Address(192.168.1.251 - tftp server) และ Next File (thinstation.nbi.zpxe - ไฟล์ตั้งต้นเพื่อจะไปโหลด thinstation.nbi ขนาด 10M ต่อ) ซึ่งสองค่านี้จะเป็นค่าที่บอกเครื่องลูกข่ายว่า ถ้าจะเปิด PXE หรือ บูตผ่าน LAN CARD จะต้องไปเอาไฟล์์ที่เครื่องไหน ไฟล์ชื่ออะไร
2. เมื่อเครื่องลูกข่ายทราบ ค่า Next Address และ Next File และเครื่องลูกข่ายก็เปิด PXE หรือ บูตผ่าน LAN CARD เครื่องลูกข่ายก็จะเชื่อมต่อผ่านโปรโตคอล TFTP ไปที่เครื่องซึ่งกำหนดโดย Next Address(192.168.1.251) ซึ่งตั้งเป็น TFTP SERVER(192.168.1.251) (จากรูปผมใช้เป็นเครื่องเดียวกัน) และ Load ไฟล์ ตามชื่อ Next File(thinstation.nbi.zpxe - ไฟล์ตั้งต้นเพื่อจะไปโหลด thinstation.nbi ขนาด 10M ต่อ) ใน root ของ TFTP SERVER นั้นๆ มาเก็บไว้
ซึ่งไฟล์ที่ผมใช้นั้น เป็นไฟล์ Image Linux ตัวนึง ชื่อว่า Thinstation (http://www.thinstation.org) โดยมันจะเหมือนเป็น Linux ที่ทำหน้าที่เป็น Remote Desktop อย่างเดียวผ่าน โปรโตคอล RDP และ นอกจากไฟล์ Image ก็จะมีไฟล์ การตั้งค่า RDP มาด้วย โดยในไฟล์จะระบุเครื่องที่ จะ Remote เข้าไป
3. เมื่อได้ไฟล์ Image แล้ว เครื่องลูกข่ายก็จะ Build Image ไฟล์นั้นๆ เสมือนเครื่องลูกข่าย มี Linux ตัวเล็กๆ(thinstation.nbi) อยู่ตัวนึงถูก RUN อยู่ในหน่วยความจำและ Linux ตัวเล็กๆ นี้จะวิ่งหาไฟล์ config ของตัวเอง เช่น thinstation.conf-192.168.1.22 หรือ thinstation.conf.network เพื่อกำหนดค่าให้ตัวมันเองต่อไป
4. Linux ตัวนี้ก็จะเรียกโปรแกรมคล้ายๆ Remote Desktop ขึ้นมา และนำค่าที่ได้พร้อมไฟล์ Image ซึ่งเป็น IP Address (thinstation.conf-192.168.1.22 หรือ thinstation.conf.network ค่า SESSION_0_RDESKTOP_SERVER) ของเครื่องที่เปิดให้ Remote เข้าไปได้(Terminal Service) แล้วก็ Remote เข้าไปเลย ขั้นตอนบูตข้างต้นใช้เวลาประมาณ 1 นาที สิ่งที่เห็นก็คือหน้าจอ Login ของ Windows ซึ่งพร้อมใช้งาน
ถึงตอนนี้อาจดูแล้วงงๆ ว่าเป็นไปได้เหรอ ไม่มี Harddisk บูทใช้ windows ได้ ผมเองก็พยายามอธิบายแต่ก็เขียนได้เท่านี้ ถ้ายังไม่เข้าใจลองอ่าน ทั้ง 6 ตอนของเรื่องนี้อีกครั้ง ;) นะครับ
|
ตามที่ผมได้ศึกษาและพัฒนาใช้ระบบนี้พบว่ามีส่วนการตั้งค่าบางส่วนใช้การตั้งค่าของ Redsktop (http://www.rdesktop.org) ซึ่งจะใช้ตรง -d <domain> -s <shell> -c <directory> -p <password> -n <hostname> -k <layout>
-f Enable fullscreen mode. This overrides the window manager and -b Force the server to send screen updates as bitmaps rather than -B Use the BackingStore of the Xserver instead of the integrated -e Disable encryption. This option is only needed (and will only -E Disable encryption from client to server. This sends an -m Do not send mouse motion events. This saves bandwidth, although -C Use private colourmap. This will improve colour accuracy on an -D Hide window manager decorations, by using MWM hints. -K Do not override window manager key bindings. By default rdesk- -S <button size> -T <title> -N Enable numlock syncronization between the Xserver and the remote -X <windowid> -a <bpp> -z Enable compression of the RDP datastream. This currently only -x <experience> -P Enable caching of bitmaps to disk (persistent bitmap caching). -r <device> Following devices are currently supported: -r comport:<comport>=<device>,... -r disk:<sharename>=<path>,... -r lptport:<lptport>=<device>,... -r printer:<printername>[=<driver>],... -r sound:[local|off|remote] -0 Attach to the console of the server (requires Windows Server -4 Use RDP version 4. -5 Use RDP version 5 (default). |
สร้างระบบ ThinClient ใช้ในองค์กร สุดประหยัดคุ้มค่า
- สร้างระบบ ThinClient ใช้ในองค์กร สุดประหยัดคุ้มค่า ตอนที่ 8
- สร้างระบบ ThinClient ใช้ในองค์กร สุดประหยัดคุ้มค่า ตอนที่ 7
- สร้างระบบ ThinClient ใช้ในองค์กร สุดประหยัดคุ้มค่า ตอนที่ 6
- สร้างระบบ ThinClient ใช้ในองค์กร สุดประหยัดคุ้มค่า ตอนที่ 5
- สร้างระบบ ThinClient ใช้ในองค์กร สุดประหยัดคุ้มค่า ตอนที่ 4
- สร้างระบบ ThinClient ใช้ในองค์กร สุดประหยัดคุ้มค่า ตอนที่ 3
- สร้างระบบ ThinClient ใช้ในองค์กร สุดประหยัดคุ้มค่า ตอนที่ 2
- สร้างระบบ ThinClient ใช้ในองค์กร สุดประหยัดคุ้มค่า ตอนที่ 1
ผู้เขียน/อ้างอิง : จักรกฤษณ์ แร่ทอง
ระบบปฏิบัติการและซอฟท์แวร์
เครื่องลูกข่าย(เก่าสุดเป็น 486 DX100) ไม่มี HARDDISK ใช้ Windows ได้ ทำทุกอย่างได้เหมือนกับเครื่องพีซีทั่วไป
เครื่องลูกข่าย(เก่าสุดเป็น 486 DX100) ไม่มี HARDDISK ใช้ Windows ได้ ทำทุกอย่างได้เหมือนกับเครื่องพีซีทั่วไป
เครื่องลูกข่าย(เก่าสุดเป็น 486 DX100) ไม่มี HARDDISK ใช้ Windows ได้ ทำทุกอย่างได้เหมือนกับเครื่องพีซีทั่วไป
เครื่องลูกข่าย(เก่าสุดเป็น 486 DX100) ใช้ Windows พิมพ์งานได้ ทำทุกอย่างได้เหมือนกับเครื่อง PC ปรกติ
แป้มพิมพ์ลัดทั่วไป แป้นพิมพ์ลัดของแป้นพิมพ์ Microsoft natural keyboard,แป้นพิมพ์ลัดของ Windows Explorer
เทคนิคการปรับแต่ง Registry
เหมาะที่จะเอาไว้ดูคร่าวๆมากกว่า หรือเอาไว้ดูตามร้านขายคอมพ์ หากเราไปเลือกซื้อ แต่ไม่แน่ใจในเสปก
Microsoft Virtual PC นั้น เป็นโปรแกรมจำลองเครื่องคอมพิวเตอร์ ขึ้นมาบนระบบคอมพิวเตอร์
เพิ่ม Role ให้กับเซิร์ฟเวอร์จากหน้าต่าง Manage Your Server ลักษณะเช่นเดียวกับการติดตั้งเปนไฟล์เซิร์ฟเวอร์
การเปลี่ยนชื่อเครื่อง การเปลี่ยนกลุ่ม การจัดการยูสเซอร์ นโยบายความปลอดภัย การจัดการจากระยะไกล การจัดการฮาร์ดดิสก์
ความคิดเห็น/แนะนำ/ติชม/อื่นๆ
- บอย พิษณุโลก [15 ก.ค. 2553 , 11:45 AM]
ผมโหลดไอ้ตัว DHCP มาแล้วแต่ใช้ได้แค่ 30 วันเอง
- teang [15 ธ.ค. 2554 , 10:01 AM]
ถ้าใช้วินโด้7 dhcp ให้ใช้เป็นของ http://www.dhcpserver.de/dhcpsrv.htm (ฟรี) ใช้ง่าย ได้ทุกวินโด้