สร้างระบบ ThinClient ใช้ในองค์กร 7/8
อัปเดท : 5 กุมภาพันธ์ พ.ศ.2552 , แสดง : 18,493 , ความคิดเห็น : 2
ADD PRINTER สำหรับระบบ Terminal (Add Printer Server) สำหรับระบบ Terminal แม้ว่า Printer จะต่อโดยตรงกับเครื่องลูกก็จะยังไม่สามารถใช้งานตรงๆได้เพราะหน้าจอที่ใช้งานเป็นหน้าจอของเครื่อง Remote ดังนั้นการ Add Printer ต้อง Add ผ่านเครื่อง Remote โดยต่อผ่าน TCP/IP ของเครื่องลูกข่าย
เช่น เครื่องลูก(192.168.1.22) มี Printer ต่อที่ Port LPT1 และเครื่องลูกได้ Boot Remote ไปใช้งานเครื่องแม่(192.168.1.251) ดังนั้นหน้าจอในเครื่องลูกที่เห็นจะเป็นหน้าของเครื่องแม่ ในการ Add Printer ผ่านหน้าจอ(Remote)เครื่องแม่ ต้อง Add ผ่านหรือใช้ IP ของเครื่องลูกซึ่งต่อ Printer ตรงอยู่ ในที่นี้คือ 192.168.1.22
การ ADD PRINTER โดยรวมสรุปคล้ายๆกับ add print server ทั่วๆไป แต่ระบบนี้เครื่องลูกเองจะทำหน้าที่เป็น print server อยู่ด้วย
และการตั้งค่าว่าเครื่องลูกนั้นใช้ printer แบบไหนได้บ้าง ดูได้จาก
#PRINTER_0_NAME=parallel
#PRINTER_0_DEVICE=/dev/printers/0
#PRINTER_0_TYPE=P
#PRINTER_1_NAME=serial
#PRINTER_1_DEVICE=/dev/ttyS1
#PRINTER_1_TYPE=S
#PRINTER_2_NAME=usb
#PRINTER_2_DEVICE=/dev/usb/lp0
#PRINTER_2_TYPE=U
Add Printer (Network Printer/Printer Server)
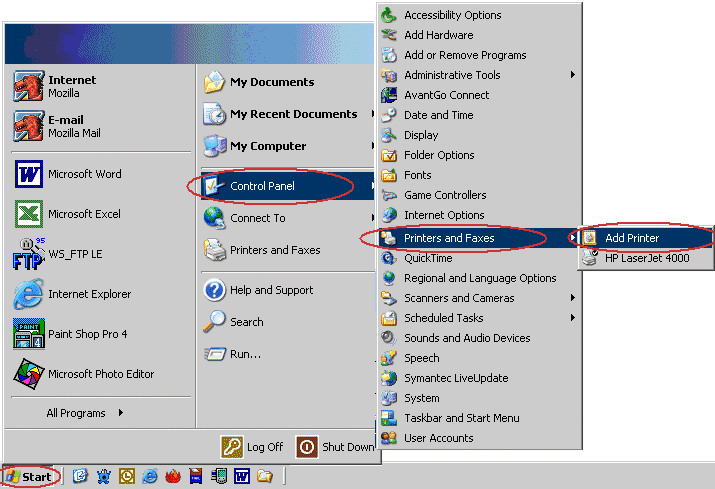
1. Click on the Start button, then click Control Panel, then click Printers and Faxes, then click Add Printer.
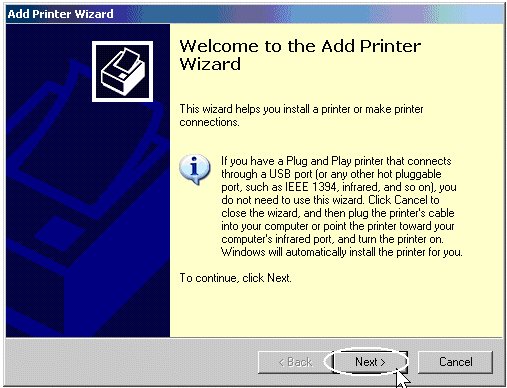
2.A new Add Printer Wizard window opens. Click Next to start.
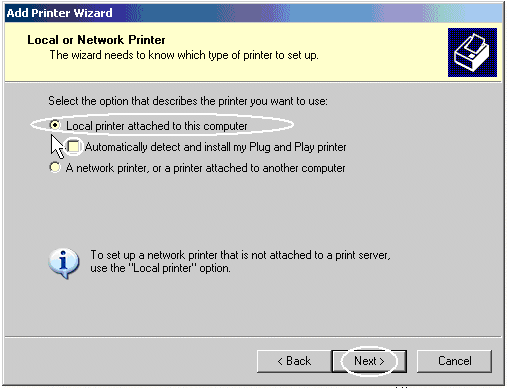
3. Select Local printer attached to this computer. Make sure Automatically detect and install my Plug and Play printer is NOT checked.
4. Then click Next to continue.
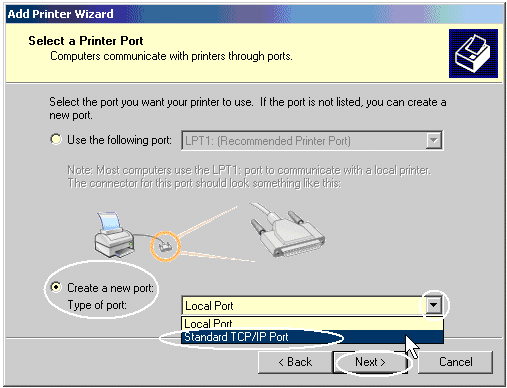
5. We will create a new port for your network printer. Select Create a new port.
6. Beside Type of Port, click on the down arrow, then click on Standard TCP/IP Port.
7. Click Next to continue.
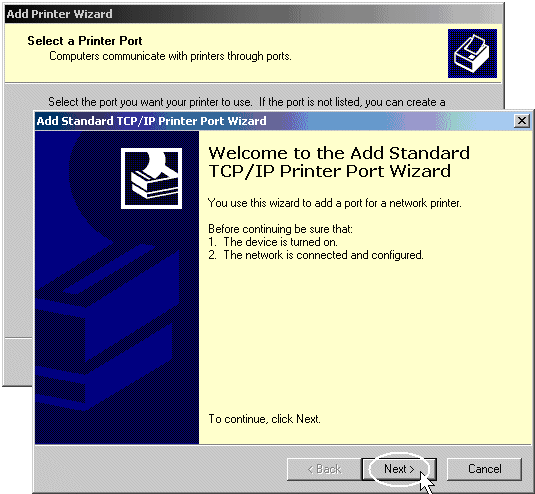
8. A new Add Printer Port Wizard will open. Click Next to continue.
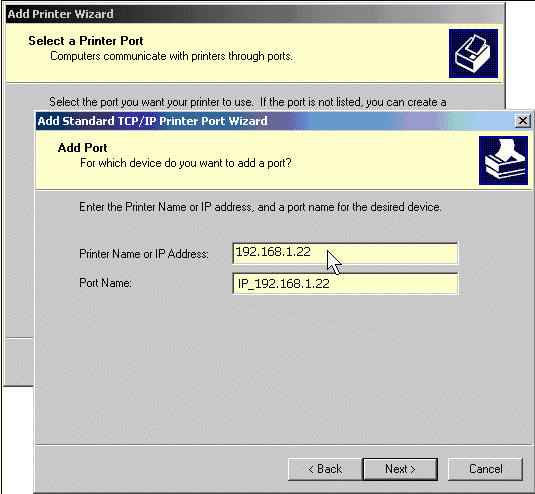
9. You must now type your printer's IP Address in the Printer Name or IP Address field.
10. The Port Name will automatically be filled when you enter the IP Address. Do not change the Port Name.
11. Click Next to continue.
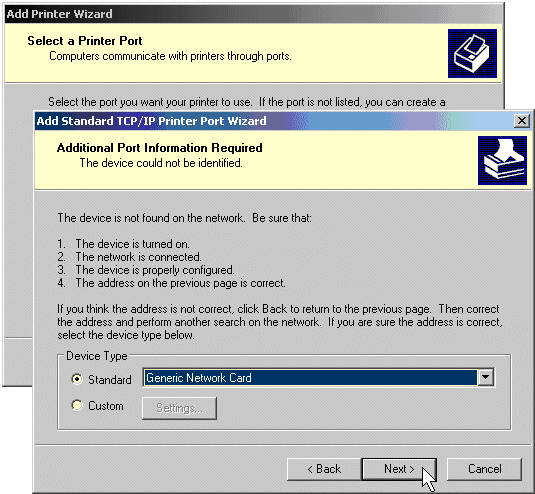
12. IF YOU HAVE PROBLEMS, then you will see the screen on the right. This means that the IP Address for the printer is NOT available on the network. Select the Back button and make sure you entered the correct IP Address. Check to see that your network printer is powered on and displays a 'ready' status.
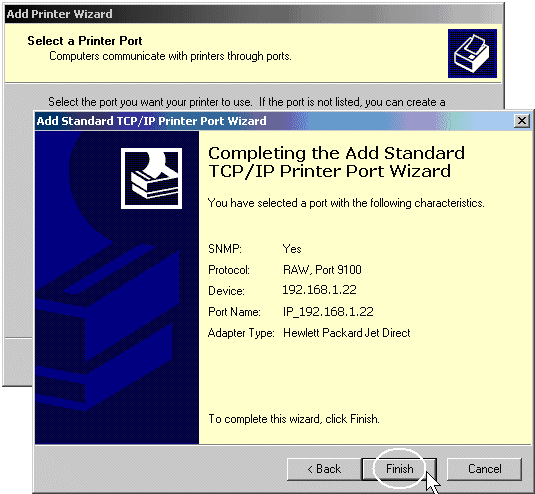
13. IF YOU DID NOT HAVE PROBLEMS, Windows XP will scan the network to find your printer's IP Address. This may take a few seconds. Select Finish to continue.
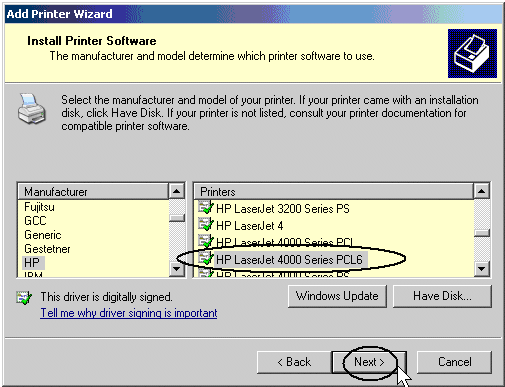
14. You must now select the printer's manufacturer and model. Windows XP will automatically select the detected manufacturer and printer driver. Normally, you will not have to change this selection.
15. OPTIONAL: If your printer is listed but you have more than one printer model to choose from, please select the model with PS, if available.
16. IF your network printer is NOT automatically detected, select the Windows Update button to find the proper software drivers.
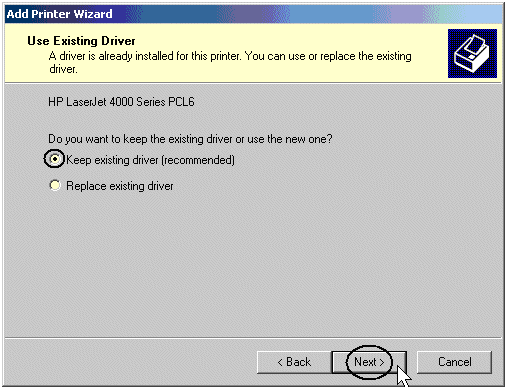
17. You will be prompted to confirm the selected printer driver. Make sure Keep existing driver is selected, then click Next to continue.
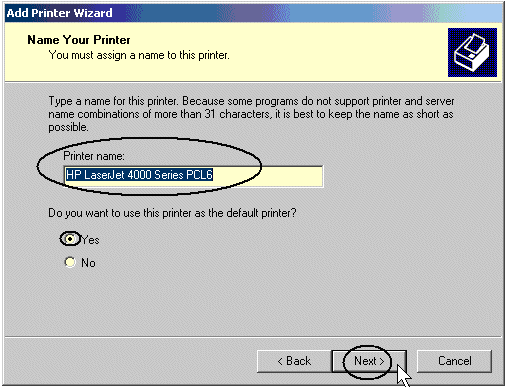
18.You will be prompted to assign the printer a Name. You can use the default name, or add more info to indicate the printer location, such as My Office, Hallway, Foyer, Room 222, etc.
19. Select Yes if you want to use the printer as the default printer. Click Next to continue.
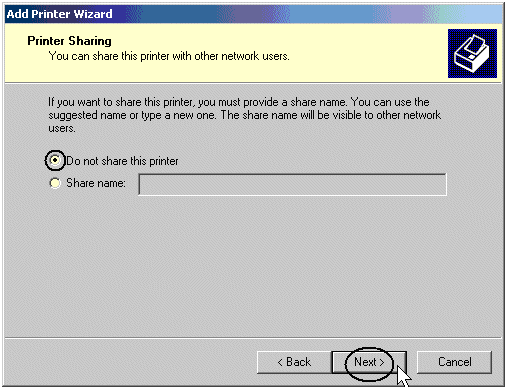
20. You will be prompted to share the network printer. Do NOT share the network printer.
21. Click Next to continue.
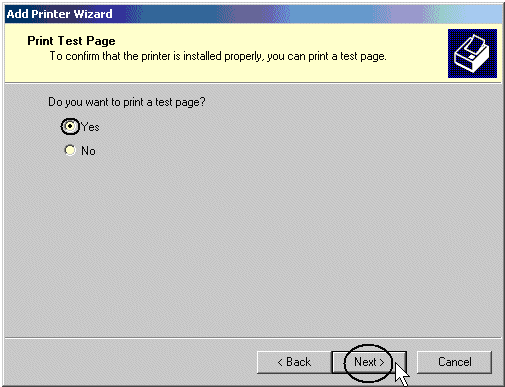
22. You will be prompted to print a test page. Select Yes, then click Next.
23. Check your network printer to make sure your page printed. Select Yes when prompted to confirm a successful test page.
24. Click on the Finish button to complete the Add Printer Wizard.
Congratulations! If your test page printed, you have successfully installed the network printer.
สร้างระบบ ThinClient ใช้ในองค์กร สุดประหยัดคุ้มค่า
- สร้างระบบ ThinClient ใช้ในองค์กร สุดประหยัดคุ้มค่า ตอนที่ 8
- สร้างระบบ ThinClient ใช้ในองค์กร สุดประหยัดคุ้มค่า ตอนที่ 7
- สร้างระบบ ThinClient ใช้ในองค์กร สุดประหยัดคุ้มค่า ตอนที่ 6
- สร้างระบบ ThinClient ใช้ในองค์กร สุดประหยัดคุ้มค่า ตอนที่ 5
- สร้างระบบ ThinClient ใช้ในองค์กร สุดประหยัดคุ้มค่า ตอนที่ 4
- สร้างระบบ ThinClient ใช้ในองค์กร สุดประหยัดคุ้มค่า ตอนที่ 3
- สร้างระบบ ThinClient ใช้ในองค์กร สุดประหยัดคุ้มค่า ตอนที่ 2
- สร้างระบบ ThinClient ใช้ในองค์กร สุดประหยัดคุ้มค่า ตอนที่ 1
ผู้เขียน/อ้างอิง : จักรกฤษณ์ แร่ทอง
ระบบปฏิบัติการและซอฟท์แวร์
เครื่องลูกข่าย(เก่าสุดเป็น 486 DX100) ไม่มี HARDDISK ใช้ Windows ได้ ทำทุกอย่างได้เหมือนกับเครื่องพีซีทั่วไป
เครื่องลูกข่าย(เก่าสุดเป็น 486 DX100) ไม่มี HARDDISK ใช้ Windows ได้ ทำทุกอย่างได้เหมือนกับเครื่องพีซีทั่วไป
เครื่องลูกข่าย(เก่าสุดเป็น 486 DX100) ไม่มี HARDDISK ใช้ Windows ได้ ทำทุกอย่างได้เหมือนกับเครื่องพีซีทั่วไป
เครื่องลูกข่าย(เก่าสุดเป็น 486 DX100) ใช้ Windows พิมพ์งานได้ ทำทุกอย่างได้เหมือนกับเครื่อง PC ปรกติ
แป้มพิมพ์ลัดทั่วไป แป้นพิมพ์ลัดของแป้นพิมพ์ Microsoft natural keyboard,แป้นพิมพ์ลัดของ Windows Explorer
เทคนิคการปรับแต่ง Registry
เหมาะที่จะเอาไว้ดูคร่าวๆมากกว่า หรือเอาไว้ดูตามร้านขายคอมพ์ หากเราไปเลือกซื้อ แต่ไม่แน่ใจในเสปก
Microsoft Virtual PC นั้น เป็นโปรแกรมจำลองเครื่องคอมพิวเตอร์ ขึ้นมาบนระบบคอมพิวเตอร์
เพิ่ม Role ให้กับเซิร์ฟเวอร์จากหน้าต่าง Manage Your Server ลักษณะเช่นเดียวกับการติดตั้งเปนไฟล์เซิร์ฟเวอร์
การเปลี่ยนชื่อเครื่อง การเปลี่ยนกลุ่ม การจัดการยูสเซอร์ นโยบายความปลอดภัย การจัดการจากระยะไกล การจัดการฮาร์ดดิสก์
ความคิดเห็น/แนะนำ/ติชม/อื่นๆ
- หลอดไฟ [02 พ.ย. 2554 , 03:10 PM]
เราใช้ อีก วิธี นะ 1.ไปที่ Run 2.พิมพ์ ชื่อคอมพิวเตอร์ หรือ IPaddress 3.จะแสดง ไฟล์ที่แชร์ 4.ดับเบิ้ลคลิก เครื่องปริ้น ก็ เสร็จ.... Good Luck.
- sila [16 ส.ค. 2555 , 06:06 PM]
วิธีการข้างบนนี้ ใช้กับระบบปฎิบัติการที่เป็น windows xp ใช่รึป่าวครับ ซึ่งผมได้ทดลองทำแล้ว ไม่สามารถพิมพ์ผ่าน remote desktop ได้ครับ แต่ถ้าเป็น windows 7 ไม่มีปัญหาเรื่อง printer ครับ